Vertical Milling Machine: A Complete Guide for Beginners
If you're new to machining, the vertical milling machine is one of the most essential and versatile tools you'll encounter. Whether you're a hobbyist setting up a home workshop, a student learning machining basics, or a small business owner expanding capabilities, understanding this tool is key to unlocking precision, creativity, and productivity. This guide breaks down everything beginners need to know—from what a vertical milling machine is and how it works, to its key parts, basic operations, safety rules, and choosing the right model. No prior experience required: we'll keep it simple, practical, and focused on beginner priorities.
Vertical milling machines are used across industries—automotive, aerospace, prototyping, and custom fabrication—for shaping, cutting, and finishing materials like metal, plastic, and wood. Unlike horizontal milling machines (with a horizontal spindle), vertical models have a vertical spindle that holds cutting tools and feeds downward into the workpiece. This design simplifies tool changes, setup, and visibility, making them ideal for precision work and a staple in any workshop. Let's dive into the fundamentals to build your confidence.
What Is a Vertical Milling Machine? (Beginner-Friendly Definition)
A vertical milling machine removes material from a workpiece using a rotating cutting tool mounted on a vertical spindle. The spindle— the rotating shaft holding the tool—feeds straight down or moves up and down to shape the workpiece. This vertical orientation lets you access the workpiece from above, simplifying setup and visibility—perfect for beginners still learning.
At its core, it works by rotating a multi-toothed tool (end mill, face mill, drill bit) while the workpiece moves along X, Y, and Z axes to shape material precisely. The goal is to create flat surfaces, slots, holes, or custom profiles. Unlike drills or lathes, vertical mills offer more control and versatility, letting you perform multiple operations in one setup.
Key takeaway: Vertical mills are beginner-friendly—intuitive to set up, with clear visibility of the cutting area, and capable of simple to complex tasks. They come in manual and CNC (computer numerical control) models, so you can start with a basic manual machine and upgrade as you gain skills.
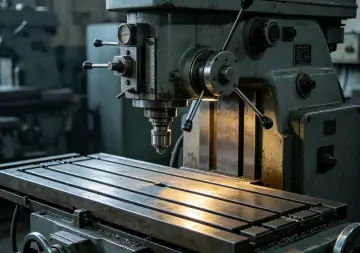
Key Parts of a Vertical Milling Machine (Learn the Basics)
Familiarizing yourself with core components is critical for safe, effective use. Here are the essential parts every beginner needs to know:
1. Base & Column
The base is the heavy, rigid cast iron foundation that absorbs vibrations (which ruin precision and damage tools). The column is a vertical beam on the base that supports the spindle head and guides the knee's vertical movement. Together, they ensure stability—vital for accurate cuts, especially with hard materials like steel.
2. Knee
The knee, mounted on the column's front, moves up and down (Z-axis) to adjust cut depth. It supports the saddle and table, controlled by a handwheel or power feed. For beginners, the knee's handwheel is frequently used to position the workpiece relative to the tool.
3. Saddle & Table
The saddle sits on the knee and moves front to back (Y-axis). The table, mounted on the saddle, moves left to right (X-axis) and is where you clamp workpieces with a vise or clamps. Most tables have T-slots to secure fixtures tightly, preventing movement during cutting.
4. Spindle Head
Mounted on the column's top, the spindle head houses the spindle and the motor that powers its rotation. It has controls for adjusting spindle speed (RPM), and many beginner models have variable-speed heads for easy adjustment across materials. Some heads swivel for angled cuts without repositioning the workpiece.
5. Spindle
The spindle is the machine's “heart”—a rotating shaft that holds tools via a collet or arbor. Its speed and stability directly impact cut quality and tool life. Common beginner tapers are R8 (small manual mills) and BT40 (versatile setups). It rotates clockwise/counterclockwise, measured in RPM.
6. Controls & Handwheels
Manual mills have handwheels for X, Y, Z axes, marked with graduations for precise movements (often 0.001 inches or 0.01 mm). Some have power feeds to automate table movement, reducing fatigue and ensuring consistency. Beginners should start with manual controls to build foundational understanding.
7. Coolant System
A coolant system sprays cutting oil or water-based coolant to reduce heat, lubricate tools, and wash away chips. This extends tool life, improves surface finish, and prevents workpiece overheating. Most beginner machines have a simple flood system with an adjustable reservoir.
Basic Operations You Can Do with a Vertical Milling Machine
Vertical mills are versatile, even for beginners. Here are the most common operations with simple step-by-step guides:
1. Face Milling
Face milling creates flat, smooth surfaces (e.g., flattening a metal block). Steps: Secure the workpiece in a vise, mount a face mill in the spindle, set the right speed (lower for hard materials, higher for soft), move the table up (Z-axis) to contact the rotating tool, and move the table along X/Y axes to cover the surface with consistent depth.
2. End Milling
End milling cuts slots, grooves, or edges using an end mill (cylindrical tool with teeth on ends/sides). Steps: Mount an end mill, set speed, align the tool with the cut area, lower the spindle (Z-axis) to desired depth, and move the table along X/Y axes to cut.
3. Drilling
Vertical mills drill holes more precisely than drill presses. Steps: Mount a drill bit with an adapter, mark the hole, secure the workpiece, set a low speed (slower than milling), and lower the spindle (Z-axis) to drill through. Use coolant to prevent overheating.
4. Tapping
Tapping creates internal threads in drilled holes (for bolts/screws). Steps: Drill a hole slightly smaller than the tap, mount the tap, set a slow speed (clockwise for right-hand threads), lower the spindle gently to cut threads, and use cutting oil to avoid breaking the fragile tap.
Safety Rules for Beginners (Non-Negotiable!)
Safety is paramount for beginners—vertical mills are powerful, and mistakes can cause injury or machine damage. Follow these rules every time:
- Wear proper PPE: Safety glasses are mandatory (protect eyes from chips/coolant). Ear protection is recommended (mills are noisy). Avoid loose clothing, gloves, jewelry, and tie back long hair to prevent entanglement.
- Secure workpiece and tool: Clamp workpieces tightly—unsecured pieces can fly off. Ensure tools are properly mounted and tightened with a draw bar.
- Never touch moving parts: Keep hands/clothing away from the rotating spindle/tool. Use a chip brush/pliers to remove chips (they're hot/sharp—never use bare hands).
- Start slow and test: Test speed and movement before full cuts. Use light, shallow cuts to avoid overloading the machine or breaking tools.
- Know the emergency stop: Locate the red emergency stop before turning on the machine—use it immediately if something goes wrong.
- Keep the workspace clean: Remove debris/clutter to prevent trips or interference. Never use compressed air (blows chips into eyes or damages components).
- Read the manual: Every machine is different—learn controls and safety tips from the manufacturer. Ask a qualified operator for help if unsure.
How to Choose a Vertical Milling Machine for Beginners
Choosing your first vertical mill doesn't have to be overwhelming. Focus on simplicity, affordability, and versatility. Here are key factors and beginner-friendly recommendations:
1. Manual vs. CNC
Start with a manual vertical milling machine. They're simpler to learn, more affordable, and build hands-on skills. CNC machines are automated (great for complex parts) but require G-code knowledge and cost more. Upgrade to CNC once you master manual operation. Top manual models: Sherline 5000 (economical mini mill) and Precision Matthews PM-727M (best value for serious hobbyists).
2. Size & Space
Consider your workspace. Benchtop mills (100–500 lbs) are compact, perfect for home workshops/garages. Floor-standing models are larger/powerful but need more space. Beginners should choose benchtop models for easy setup. Budget-friendly: Eleoption Mini Benchtop Mill. For small shops: Jet 18-Inch Mill Drill (2 HP).
3. Power & Speed
For beginners, 1–2 HP is sufficient for soft materials (aluminum, plastic) and light cutting. Look for variable-speed spindles (50–3000 RPM) to work with different materials. Avoid high-power machines—they're overkill and harder to control as a beginner.
4. Budget
Beginner-friendly manual benchtop mills cost $500–$5,000. Mid-range models (more durable) are $5,000–$10,000. Avoid cheap, low-quality mills—they vibrate, lack precision, and break easily. Invest in a reliable entry-level model to avoid frustration.
5. Brand & Support
Choose reputable brands (Sherline, Jet, Precision Matthews) with good customer support and easy-to-find parts. Avoid unknown brands—they offer little support if something breaks. Many brands provide beginner tutorials and replacement parts.
Beginner Tips to Master Vertical Milling
Mastering vertical milling takes practice, but these tips will speed up your learning curve:
- Start with scrap material: Practice cuts on scrap metal/plastic to avoid wasting good material while learning.
- Focus on precision over speed: Take your time to position the workpiece and tool correctly—precision is more important than finishing quickly.
- Learn spindle speed basics: Soft materials (aluminum, plastic) need higher speeds; hard materials (steel) need lower speeds. Check manufacturer guidelines for tool/material combinations.
- Keep tools sharp: Dull tools cause poor cuts, overheat, and damage the machine. Sharpen or replace tools regularly.
- Practice basic setups: Master clamping workpieces and changing tools before moving to complex operations.
Common Beginner Mistakes to Avoid
Avoid these pitfalls to stay safe and get better results:
- Overloading the machine: Taking too deep a cut can break tools, damage the machine, or cause the workpiece to shift.
- Ignoring coolant: Skipping coolant shortens tool life and ruins surface finish—use it for all metal cuts.
- Rushing setup: Poorly clamped workpieces or misaligned tools lead to inaccurate cuts and safety hazards.
- Using the wrong tool: Using a drill bit for milling or an end mill for drilling reduces precision and damages tools.
Conclusion
The vertical milling machine is a beginner-friendly, versatile tool that opens up endless possibilities in machining. By understanding its parts, mastering basic operations, following safety rules, and choosing the right model, you'll quickly build confidence and skills. Remember: progress takes practice—start simple, focus on precision, and don't be afraid to make mistakes (they're part of learning). With this guide, you're ready to start using a vertical milling machine to create, prototype, and build—whether for hobby, study, or small business success.
 Email
Email sales1: +86 15312799623