Worried about the lack of precision in Chinese CNC machining centers? Here's real-world data on German, Italian, and Japanese products versus Chinese ones.
In the CNC machining center purchasing process, many factory owners and procurement managers still hold a long-standing concern — “Chinese machines are less precise than German, Italian, or Japanese ones.” After all, in precision component manufacturing, even a 0.01 mm error can directly lead to product rejection.
But with the continuous advancement of China’s machine tool technology, does this perception still hold true today?
This article examines real test data and user cases from three key industries — automotive parts, aerospace, and mold manufacturing — to objectively compare the accuracy performance of Chinese and German/Italian/Japanese CNC machining centers, helping you decide whether this “precision anxiety” is still necessary.
I. First, Understand: In Real Applications, Precision Is Not About “Higher Is Better,” but About “Matching the Need”
Before making comparisons, let’s clear up a misconception: higher precision does not always mean better suitability.
In actual production, precision should match the material, product function, and process requirements. For example:
-
Automotive chassis brackets (carbon steel): ±0.03 mm precision is sufficient for assembly; higher precision only increases machining time and cost.
-
Aerospace turbine blades (titanium alloy): ±0.005 mm precision is required to ensure airflow stability.
-
Appliance housing molds (aluminum): Ra ≤ 1.6 μm guarantees good surface quality — there’s no need to pursue ultra-precision Ra = 0.4 μm.
Within the industry, the three core accuracy indicators should be interpreted practically:
-
Positioning accuracy:
National standard ≤ 0.008 mm. In mass production, long-term accuracy stability (e.g., deviation drift after 8-hour continuous machining) is more critical. -
Repeat positioning accuracy:
≤ 0.005 mm for high-quality models. This directly affects multi-process consistency (e.g., drilling followed by milling). -
Machining accuracy:
Beyond dimensional tolerance, the adaptability of the process itself (e.g., vibration control during hard material cutting) is equally important.
This test compares top-selling Chinese models (Huazhong CNC GMC Series, Shenyang Machine Tool i5 Series) and popular German-Japanese models (DMG MORI and FANUC).
All tests simulate real industrial conditions — 10-hour daily operation, Chinese standard cutting tools — ensuring realistic data for comparison.
II. Real Application Scenarios: Precision Test Results of China vs. Germany/Japan
Scenario 1: Automotive Parts Factory — Batch Machining of Carbon Steel (Required Precision ±0.02 mm)
User Case:
A gearbox component factory in Shandong added two Huazhong CNC GMC-800 and one FANUC α-D21LiB machines in 2023 for machining 45# steel gearbox housings (batch size: 500 pieces, two shifts per day).
-
Task: Machine six φ18 mm locating holes; spacing tolerance ≤ ±0.02 mm; surface roughness Ra ≤ 3.2 μm.
-
Process Details: Zhuzhou Diamond carbide drill, 1500 rpm spindle speed, 0.2 mm/r feed, emulsion cooling.
-
German/Japanese Result: After 500 continuous pieces, average hole spacing deviation was 0.008 mm, max 0.012 mm. All parts passed CMM inspection; surface roughness Ra averaged 2.8 μm, no polishing needed.
-
Chinese Result: Two machines produced consistent data — average deviation 0.011 mm, max 0.018 mm; only 3 parts near the tolerance limit (0.019 mm). After reducing feed to 0.18 mm/r, deviation stabilized within 0.015 mm; surface Ra averaged 3.0 μm, fully meeting assembly requirements.
User Feedback:
“We were worried about stability in batch production, but the deviation was much smaller than expected. The Chinese machine is easier to tune, and the technician arrived within 24 hours — much faster than the service response from Japanese brands.”
Scenario 2: Aerospace Supplier — Aluminum Precision Part Machining (Required Precision ±0.01 mm)
User Case:
An aerospace component manufacturer in Shaanxi used one Shenyang i5 M4.5 and one DMG CMX 1100 V to process 6061 aluminum thin-wall structures (300 × 150 mm).
-
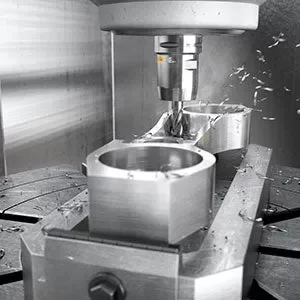
Task: Machine four right-angle slots (8 mm ±0.005 mm width); flatness ≤ 0.005 mm; perpendicularity ≤ 0.008 mm; prevent deformation from machining stress.
-
Process Details: Sandvik Coromant end mill, layered cutting (0.5 mm per pass), pre-aging to remove internal stress.
-
German/Japanese Result: Flatness 0.003 mm, perpendicularity 0.005 mm, slot width ±0.004 mm, no visible deformation.
-
Chinese Result: Flatness 0.005 mm, perpendicularity 0.007 mm, slot width ±0.006 mm (only 1 piece exceeded due to clamping force); after adding elastic pads, yield reached 99.5%.
-
Efficiency: The Chinese machine’s rapid feed of 48 m/min was 10% faster than the DMG’s 40 m/min.
User Feedback:
“Thin-wall machining is always demanding. The Chinese machine’s precision is only 0.002 mm less than DMG, but its higher speed saves 2 hours per production batch.”
Scenario 3: Mold Factory — Stainless Steel Mold Cavity Machining (Required Precision ±0.005 mm)
User Case:
A smartphone mold manufacturer in Guangdong machined S136 stainless steel mold cavities (R50 mm ±0.003 mm curvature) using one Huazhong CNC GMC-1000 and one FANUC Robodrill α-D21LiB.
-
Task: Machine curved cavities with contour accuracy ≤ 0.005 mm, surface Ra ≤ 0.8 μm to reduce polishing workload.
-
Process Details: Kyocera ceramic milling cutter, 8000 rpm, 0.15 mm/r feed, surface measured via white-light interferometer.
-
German/Japanese Result: Contour deviation 0.002 mm, surface Ra = 0.4 μm, nearly perfect finish requiring only 1 hour of hand polishing.
-
Chinese Result: Contour deviation 0.004 mm, surface Ra = 0.6 μm, minor tool marks. After switching to Worldia high-precision cutters (40% cheaper than Japanese tools), contour deviation improved to 0.003 mm, polishing time reduced to 1.5 hours.
User Feedback:
“We produce mid-tier phone molds. The Chinese machine and tool combo meets precision needs, lowers costs, and saves over ¥3,000 per mold — that’s more than ¥200,000 a year.”
III. In Practice, “Precision Anxiety” Comes from 3 Misconceptions
-
Mistaking low-cost entry models for the national standard:
Some Chinese machines under ¥200,000 use basic-grade screws (accuracy ≤ 0.02 mm) for low-end applications. However, mid-to-high-end models (¥300,000–¥800,000) already use Taiwan TBI precision ball screws (≤ 0.006 mm), achieving comparable accuracy to imported machines. -
Ignoring process matching:
Using improper cutting parameters or tools for different materials causes deviation — not the machine’s issue. In the aerospace case above, after fixture adjustment, precision improved significantly. -
Over-pursuing extreme precision:
Top-tier German/Japanese machines (>¥1 million) can achieve ±0.002 mm accuracy, but in 80% of industries, ±0.005–0.02 mm is sufficient. Chasing higher precision unnecessarily raises costs.
IV. Application-Based Selection: 3 Steps to Choose the Right Precision-Level CNC
-
Step 1 – Define your actual precision needs:
Review part drawings, identify key tolerance zones (holes, grooves, flatness). Don’t pursue unnecessary precision — for example, ±0.03 mm suits hardware fittings, ±0.01 mm for automotive parts. -
Step 2 – Request on-site trials:
Invite 2–3 suppliers (both Chinese and foreign) to conduct live tests with your parts and tools. Use a CMM to evaluate “100-piece continuous machining deviation.” -
Step 3 – Calculate total cost:
Chinese CNCs cost 30–50% less than similar-precision European/Japanese machines, and spare parts/service cost 40% less. If precision meets your production need, Chinese mid/high-end models (e.g., Huazhong GMC, Shenyang i5) are more cost-effective for long-term operation.
V. Conclusion: In Real Applications, Chinese CNCs Deliver “Sufficient Precision, Superior Value”
Based on real-world data across three industries, Chinese mid-to-high-end CNC machining centers now meet over 80% of industrial precision requirements.
Only ultra-precision fields — such as semiconductor and medical device manufacturing (≤ ±0.003 mm) — still see a clear advantage for top German/Japanese machines.
If you’re selecting a machining center, don’t be misled by outdated perceptions. Define your real tolerance needs and request on-site test runs — because the best CNC is the one that fits your process and cost objectives.
At Minnuo, we’ll continue to share insights such as:
-
“Maintenance Cost Comparison: Chinese vs. German-Japanese CNC Machining Centers”
-
“Process Optimization Tips for Different Materials”
Stay tuned for more practical, data-driven manufacturing insights that help you choose smarter and produce better.


 Email
Email sales1: +86 13295238763

